
Stonebridge Gunworks · SRO Battery Tool V2
Changing the battery in a Trijicon SRO. About a minute’s work — but read the torque warning before you tighten the cap back down.
Change the battery
Unload the firearm
Remove the magazine, lock the slide open, and visually and physically verify that the chamber is empty. Do this first, every time.
Seat the tool flat
Drop the cross fully into the cap’s slots, until the flat face around it is down against the cap. No rocking, no gap — a partly seated tool is what chews up a cap.
Turn counterclockwise
Steady hand pressure. Lift the cap straight off once it is free. Note which way the old battery sits before you tip it out.
New CR2032, plus side up
Install a fresh CR2032 with the positive (+) side facing up. Wipe the battery contact and cap clean. We use Panasonic CR2032 batteries — see below. Inspect the battery-cap O-ring before reinstalling the cap. A damaged or missing seal can allow moisture and debris into the battery compartment.
Snug it — do not crank it
Start the cap by hand so you know the threads are properly aligned. Turn clockwise until the cap seats, then stop at the first firm resistance. Do not exceed 9 in-lbs. You are compressing a seal, not tightening a structural fastener.
Do not over-tighten the battery cap
Trijicon specifies 9 in-lbs for the SRO battery cap. Do not exceed that specification.
Over-tightening can damage the cap threads, deform the seal, damage the cap or optic housing, and compromise the battery compartment seal. Damage caused by improper installation or excessive torque may not be covered by the manufacturer’s warranty or by ours.
This tool is intended for controlled hand pressure only. There is no provision for attaching a ratchet, bit driver or extension. Snug and sealed is the goal. If you have to strain to tighten the cap, you are applying too much force.
The V2 tool is intentionally stronger than the torque required for the battery cap. That added strength improves tool durability — it is not permission to tighten the cap beyond Trijicon’s specification.
Know your tool
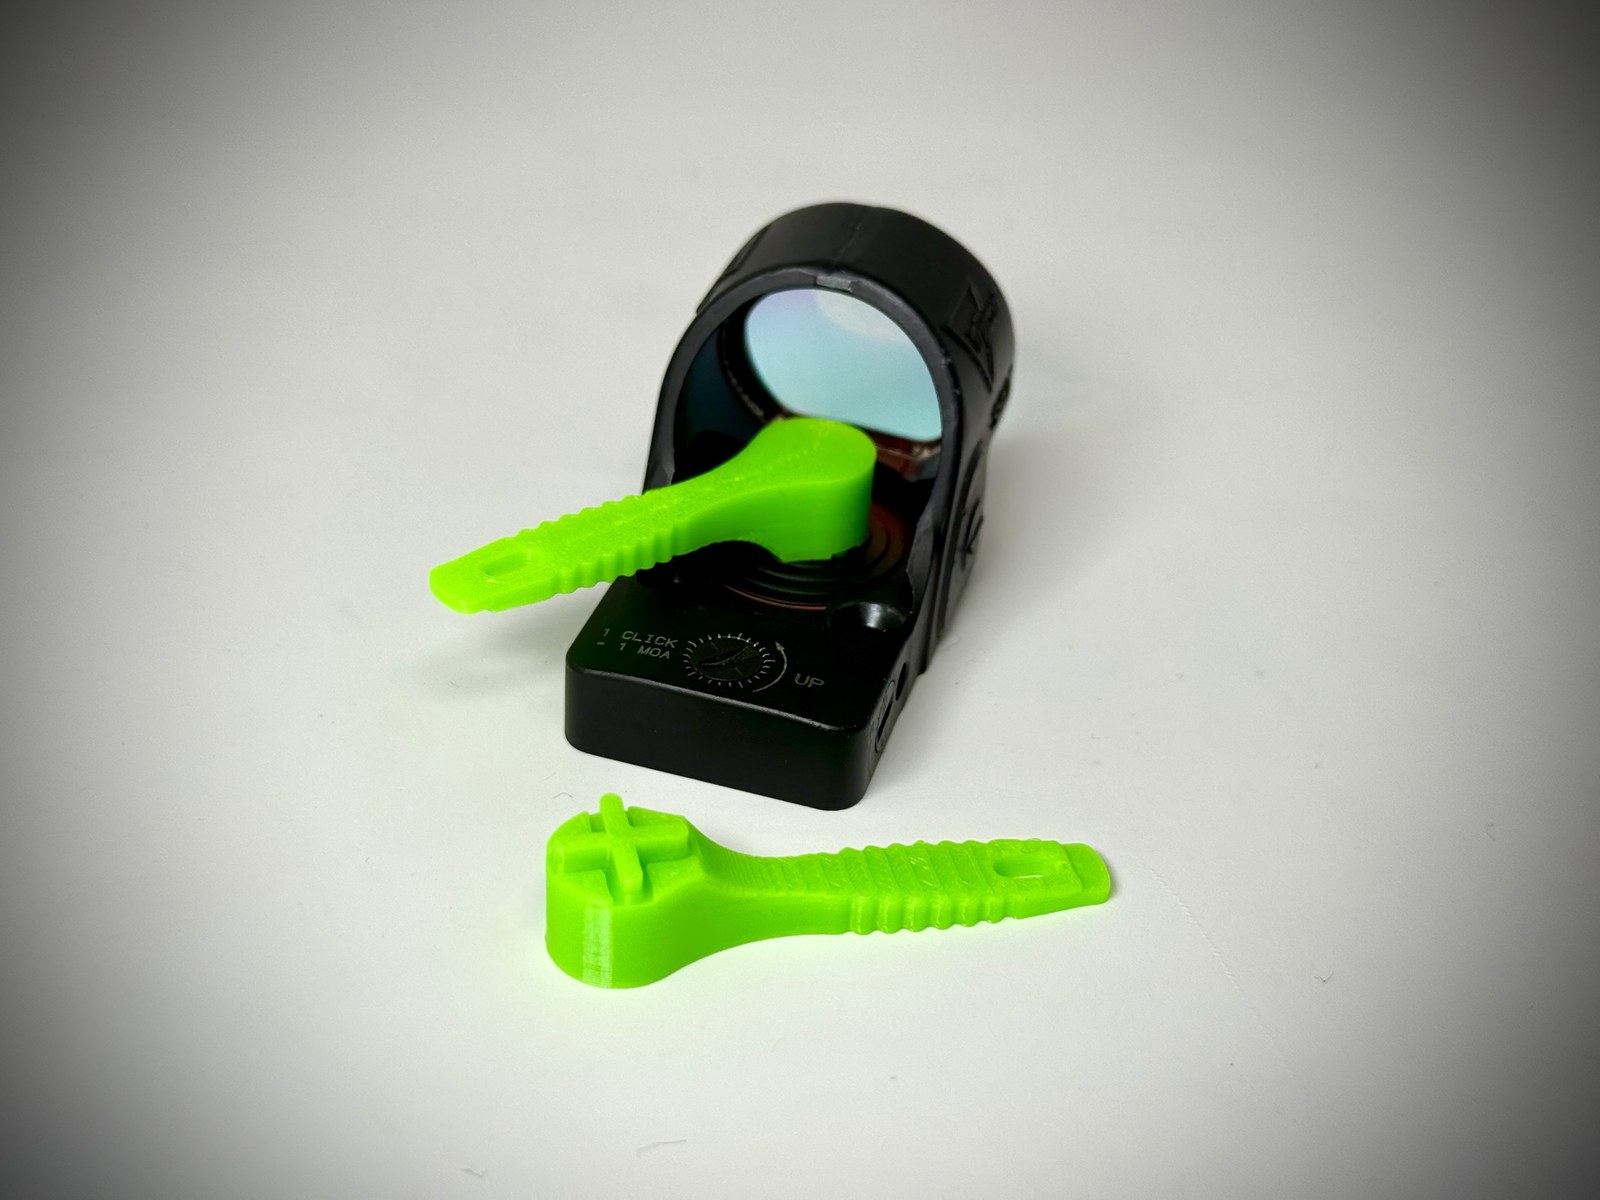 1
2
3
4
1
2
3
4
- Cross drive. The raised cross engages the slots in the SRO battery cap. It has to drop all the way in before you apply any turning force — a half-seated cross is what rounds off a cap.
- Flat face. The flat that surrounds the cross is what actually bears on the cap. It sits square against the cap face and spreads the load, instead of letting it concentrate on the slots. If the tool rocks, that face is not down — stop and re-seat it.
- Ribbed grip. Where your fingers go. The ribs give you controlled, deliberate turning at low force — which is the whole point on a fastener rated at 9 in-lbs.
- Windage adjustment blade. The flat tip at the tail is a second tool — it fits the SRO’s windage adjuster, so one tool covers both the battery and your zero. See below before you turn it.
There is deliberately nowhere on this tool to fit a ratchet, bit driver or bar. That is a design decision, not an oversight — the cap does not need that much force, and anything that could apply it could damage the optic.
1
2
- Head down flat on the cap. Square to the optic, drive fully engaged, no gap and no rocking before you turn.
- Handle out to the side. Turn counterclockwise to loosen, clockwise to close. Keep the pressure straight around the axis — do not lever the handle downward against the optic.
Using the windage adjustment end
The tail of the handle doubles as an adjustment blade, so the same tool can be used for SRO windage adjustment.
Unload the firearm before making adjustments. Seat the blade fully in the adjustment slot before turning. Move in counted clicks rather than continuous turns; the SRO is marked 1 CLICK = 1 MOA.
Never force the adjuster past the end of its travel. If you reach the adjustment limit, stop and check the mounting system, optic alignment and zeroing setup.
Confirm any adjustment at the range before relying on the new zero.
Inspect the cap seal every time
The battery-cap O-ring seals the battery compartment against moisture and debris. Trijicon rates the SRO for submersion to 10 ft (3 m), so keeping that seal clean and undamaged matters.
With the cap removed, inspect the O-ring for cuts, nicks, tears, permanent flattening, cracking, deterioration, stretching, or debris around the seal and its groove.
If the seal looks good, wipe the O-ring and sealing surface with a clean, dry, lint-free cloth and reinstall the cap. Do not apply solvents, oils, bore cleaners or other chemicals unless specifically approved by Trijicon.
If the O-ring is damaged, missing or badly deformed, do not reinstall the cap and continue using the optic as though it is sealed. Contact Trijicon for the correct replacement cap or seal rather than substituting a generic O-ring.
Which CR2032 to use
Our default is a fresh Panasonic CR2032 from a high-turnover source — a shop that sells a lot of them, not a bargain multipack that has been sitting in a warehouse. Renata, Maxell and Murata are good alternatives when they are genuinely fresh.
Two kinds to keep out of a match optic. Unknown bulk cells — the ones that arrive fifty to a bag — and coated child-safety coin cells, the ones with the bitter-tasting coating, because that coating sits between the cell and the contact. If you already run a coated cell and it has proven reliable in that exact optic, carry on. Just do not find out on a stage.
Fuller detail, including the other optics we cut for, is in our red dot battery guide.
If the cap is stuck or feels gritty
- It will not start moving. Confirm the tool is fully seated and that you are turning counterclockwise. Re-seat and try again before you add force.
- It feels gritty or binding. That is debris in the threads. Back the cap all the way out, brush or blow the threads clean, and start it again by hand.
- It goes hard after a turn or two on the way in. That is a cross-thread. Back it all the way out and restart it by hand. Forcing a cross-threaded cap is how housings get destroyed.
- Never add leverage. No ratchet, no bit driver, no bar, no pliers on the tool. Fingers only.
Confirm your zero. Pulling the battery cap does not move your dot, but the optic has been handled and the battery is new. Verify zero at the range before you count on it at a match.
What this tool fits
| Fits | The Trijicon SRO — battery cap at the head, windage adjuster at the tail. Every SRO model and reticle. |
|---|---|
| Does not fit | Trijicon RMR, RMR HD, RMRcc or RCR. Holosun. Any other manufacturer’s battery cap. The cap slots are not a shared standard — do not force it onto something else. |
Warnings and disclaimers
- Always verify the firearm is unloaded before working on a mounted optic.
- Hand pressure only. Do not use this tool with a ratchet, driver, bit holder, or any other means of increasing leverage.
- Do not exceed Trijicon’s published 9 in-lbs for the battery cap. Over-torque can damage the cap, the seal and the optic.
- This tool is a consumable. Inspect it before each use and replace it if the cross or the flat face around it is cracked, deformed or worn.
- Keep the tool and loose batteries away from children. A swallowed lithium coin cell is a medical emergency.
Stonebridge Gunworks LLC makes no warranty beyond replacement of a defective tool. We are not responsible for damage to an optic, firearm or other property, or for injury, resulting from misuse of this tool, from exceeding the manufacturer’s torque specification, or from handling a loaded firearm. Torque figures cited here are Trijicon’s published values as of the date shown below — always defer to the documentation supplied with your optic.
Need another one?
Something not covered here? Send us a question and we will email you an answer as fast as we can.
Common questions
How tight should the SRO battery cap be?
Trijicon specifies 9 in-lbs. Hand-snug with this tool and no more. Over-tightening can strip the threads, crush the seal and damage the optic — damage that is not covered by warranty.
What battery does the Trijicon SRO use?
A CR2032 lithium coin cell, installed with the positive (+) side facing up.
Does the tool do anything besides the battery cap?
Yes. The flat tip at the tail of the handle is a windage adjustment blade for the SRO, so one tool covers the battery and your zero. Seat it fully in the adjuster slot before turning, and move in counted clicks — the SRO is marked 1 click = 1 MOA.
Which CR2032 battery should I use?
A fresh Panasonic CR2032 is our default; Renata, Maxell and Murata are good alternatives when fresh. Avoid unknown bulk cells, and avoid coated child-safety coin cells in a match optic — the coating can interfere with the contact.
Will this tool fit my RMR or Holosun?
No. It is cut for the Trijicon SRO battery cap only. It will not fit the RMR, RMR HD, RMRcc, RCR, or any Holosun optic.
Do I need to re-zero after a battery change?
Removing the battery cap does not move the dot, but the optic has been handled and the battery is new. Confirm zero at the range before you rely on it.
What if the O-ring in the battery cap is damaged?
Do not reinstall it. A cut, flattened, cracked or missing O-ring means the optic is no longer sealed. Contact Trijicon for a replacement cap or seal — do not fit a generic hardware-store O-ring, because size, material and durometer all matter.
What is different about V2?
V2 is a clean-sheet Stonebridge Gunworks design with significantly greater torsional strength than the original tool. In our testing, V2 withstands at least 50% more torque before failure.
That additional strength is for durability — not additional tightening force. Always follow Trijicon’s battery-cap torque specification.
Trijicon®, SRO® and RMR® are registered trademarks of Trijicon, Inc. Stonebridge Gunworks LLC is not affiliated with, authorized by, sponsored by or endorsed by Trijicon, Inc. The SRO Battery Tool is designed and manufactured by Stonebridge Gunworks LLC, Lee’s Summit, Missouri. Torque values cited are Trijicon’s published specifications, last verified 13 September 2026.
